Showing posts with label dental laboratory. Show all posts

Wednesday, 8 February 2012

A failed dental bridge and how to avoid it

Here is a case that went wrong, so we thought it would be a good idea to post it to our blog and discuss the learnings that can be had from it.

We made this bridge for a lovely dentist and his patient, however we asked if we could do some diagnostics first - unfortunately the patient wanted the bridge returned quickly so a decision was made to go ahead with no diagnostics.

The first bridge is the one on the right. We followed the original incisal length, however once it was tried in the patient felt they were too short, and we were instructed to lengthen them.

Seems simple right? Add some ceramic and we're done. Well, no actually. When we make a bridge with metal (as this one is) we make the metal accurately to support the ceramic evenly all over, so if we lengthen the ceramic there is a whole load of incisal ceramic with no support (this is why this bridge has a large cut incisally, we were testing to see if we thought we could lengthen without remaking the metal).

We felt in this case that we would remake the metal and start over. So we did and this is the bridge on the left.

According to the patient this is now too long!

So the solution? We highly, HIGH recommend doing a diagnostic wax up with cases like this, this then serves a few purposes.

  1. It can act as way for the dentist, technician and patient to visualise the desired results AND for the technician to ascertain whether the desired result is indeed possible with the position of the teeth and gums.
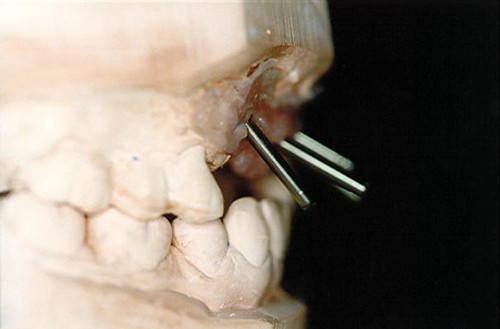
  2. It provides a template from which we can make a temporisation stent.
This second point is the crucial one in this case, if we had made a diagnostic we could have made a stent from this (pictured right) this could then have been used to make highly accurate temporaries which the patient could have worn to decide on the length.

If  they were too long, a little reduction is simple - if the patient thought they were too short then addition with composite to achieve the desired result is again easy.

All that is then required is an accurate impression of the agreed temporaries and we can make the bridge to match this in the lab.

A simple process that is so often overlooked to the detriment of patient happiness!

Thursday, 4 February 2010

Getting a Smile Design RIGHT

This is a little tip for ensuring smile designs go right first time, and it involves an accurate impression of the palate at pre-op impression stage... let me explain.

When we do diagnostic wax ups for crowns or veneers we make 2 matrices to help with the preps, one shows buccal reduction and one show incisal reduction. The key point here is that the incisal reduction matrix often only locates on the palate, especially when posteriors are also being included in the smile design.

After you have prepared the veneers/crowns and we come to make the definitive restorations we use this matrix to build the restorations in to, this ensures we position the incisal edges in exactly the right place. Once again this matrix often locates on the palate only, so if the impressions of the palates from the original diagnostic and the definitive preps don't match then we are not always able to transfer this matrix.... possibilities for errors creep in!

So, although the impression of the teeth and preps is vital, for complete reliability and to reduce the chance of uncertainty, we need an accurate impression of the palate on both the original diagnostic and the final prep impressions.


Wednesday, 16 September 2009

How to prevent marginal ridge failure on zirconia crowns

Hi.

Many dental professionals are talking about failure rates of zirconia crowns, it's often a topic of discussion at lectures and has been a problem for us in the lab also in the past. In repsonse to this I thought I would share with you a video podcast on a design technique for zirconia frameworks to prevent this problem.... since we have been doing this... 0 failures!


If you can't see the video enclosure you can watch it here on YouTube.

Monday, 14 September 2009

Save your patient's marriage as well as fixing their teeth

It's not often that marriage guidance counselling and dentistry cross paths is it, but in the case of snoring appliances this is definitely the case.

We've made a few of these great little appliances in the lab recently with some brilliant results... and no doubt some relationships saved too. So how do they work?

How does the appliance work?
(Edited extract from Silensor website)
Studies have shown that approximately 40% of the population of the industrialised countries snore and that this increases to 60% in men above the age of 60.

Most of the noises produced by snoring are generated by vibration of areas of the soft tissues. During sleep, there is a natural relaxation of the muscle tone in the neck and pharynx and the normal firmness of the tissues decreases, resulting in the formation of bottlenecks or even complete obstruction of the airways, especially when the patient lies on their back.

Due to this narrowing of the pharyngeal space, the required volume of air must be respired at a higher velocity to deliver the same quantity of air. This results in stimulation and vibration of soft tissues, such as the velum palatinum (soft palate) and the uvulum.

The SILENSOR makes use of the fact that the pharyngeal space is enlarged when the lower jaw is displaced in an anterior direction.

The SILENSOR consists of two separate clear splints made in either hard or soft materials which fit over the upper and lower arches. The splints are connected by two lateral rotating connectors which gently pull the lower jaw forward. Any further opening of the mouth increases the anterior displacement of the lower jaw.

The connectors come in 4 lengths and we usually start with length number 2. If the patient doesn't feel the benefit we can use a shorter connector to move the lower jaw more anteriorly. Alternatively if the patient feels length 2 is too much we can use a longer connector and not move the lower jaw quiet so much.

What do we need at the lab?

All we need at the lab are upper and lower impressions, a centric bite and a note as to whether the patient requires hard or soft splints. The device can be returned within 10 workings with no interim appointments needed. The lab fee for this is £167 and the person to contact at the lab is Keith

This is one of the simplest and quickest surgery procedures with only 2 appointments and 2 impressions needed; and yet, it can provide the most life changing results for patients that suffer from this problem... although the person that often benefits the most is their partner!

An opportunity to market them to your patients

And now with my marketing head firmly screwed on... why not run a special offer to your patients for the end of next month at Halloween...

"Make sure the only thing keeping you awake at night is your Phasmophobia*... XX% off anti-snoring appliances from 31st October to Xth of November

*an abnormal and persistent fear of ghosts, spectres and phantasms to you and me"

And on that bomb shell... I'll say no more...

Mark

Thursday, 27 August 2009

Taking shades for dentists

Do you often find taking shades in the dental practice difficult?

Well as an answer to some of these issues I have prepared this slide show for dentists, I have lectured all over the world on this subject, so this presentation is a summary of my thoughts on the subject.

It's a bit of an experiment really in using presentations in this way... so I am eager to hear what you think.

Should I do more of these?

Do you like the format?

I have loads of pesentation that can be uploaded in this way, but I need to know your thoughts and then I can modify the pesentations to be better.

If you can't see the presentation below, here is a link to view it on the web. No signups, no forms to fill in, just click and watch!

If you like the presentation please share it on Facebook, Twitter etc... the links to do this are on the embed tab on the presentation below.

ENJOY.....

Mark

Monday, 24 August 2009

How to design, plan and manage a complex implant case


Fitting a complex implant case can be very stressful, as you well know! Sometimes even a single unit implant can present untold problems. You lose valuable surgery time if the implants don't fit and damage patient confidence if the aesthetics aren't as desired. An unhappy patient won't tell their friends and this costs! It costs in losing that patient and in costs in the loss of opportunity that arises out of them telling their friends about you.

We've been helping our dentists with their implant cases for more than 20 years, and decided that it is time to share some of that wealth of experience in the form of another eCourse (97 dentists have taken our cosmetic eCourse)...

'A protocol for the reconstruction of large implant cases' FREE eCourse

I (Mark) am the cosmetic dude at the lab, Keith is the implant guru and although I have written the eCourse the knowledge and experience has come from the deep pool of knowledge that Keith holds in his head.

In the 4 part eCourse, which comes in email format and at no cost to you, you will discover:

  1. How to plan for, and ensure the patient is happy with, a large reconstruction case
  2. How to restore and plan a large case using an Over Denture
  3. How to restore and plan a large case using a Fixed Bridge
  4. How to ensure accurate bites are recorded and transfered to the laboratory
  5. How to ensure the patient is happy with the aesthetics BEFORE the case is finalised

So however you decide to restore your implant case, enrolling on our eCourse will significantly assist you in providing the best results for your patients.


As ever, we long to hear... no, we CRAVE your feedback so we can develop and grow and then share this knowledge again! So, please reply to any/all emails in the eCourse and I'll blog the responses so we can all develop together. Think of this eCourse not as the end, or the answer to all the questions... but as the beginning and the stimulus to ask the right questions in the first place!

Looking forward to taxing yours and Keith's mind with your responses.

Cheers for now,

Mark

P.S. The implant eCourse is FREE and simply requires a name and email address, sign up here

Thursday, 9 July 2009

Cosmetic Dental Laboratory Smile Designs

Hi, welcome to our first SBO Blog post!

We are excited to announce the first in a series of eCourses (each worth £100 but at no charge to you) that we are going to be launching this year on the subject of Smile Designs. Other eCourses will follow on dental implants and dentures.

Over the years we have made many of these for ecstatic patients, yet we are often asked to compromise on HOW we do them... well, no more!

Here is our definitive guide to Smile Designs from the UK's premier dental laboratory.