Wednesday, 29 February 2012

SBO Dental Laboratory Implant Evening 13th March

SBO  Dental Laboratory
Implant Evening 13th March
7.00pm
HOW TO RESTORE LARGE IMPLANT CASES
Discuss the stages,taking the patient from initial consultation,
 through diagnostics to the final restoration.
These step by step principles help make these large challenging cases
routine and predictable.

1hr 30mins CPD
Call to book a place 01707 663 293
15, Station Close,Potters Bar,Herts,EN6 1TL


Wednesday, 8 February 2012

A failed dental bridge and how to avoid it

Here is a case that went wrong, so we thought it would be a good idea to post it to our blog and discuss the learnings that can be had from it.

We made this bridge for a lovely dentist and his patient, however we asked if we could do some diagnostics first - unfortunately the patient wanted the bridge returned quickly so a decision was made to go ahead with no diagnostics.

The first bridge is the one on the right. We followed the original incisal length, however once it was tried in the patient felt they were too short, and we were instructed to lengthen them.

Seems simple right? Add some ceramic and we're done. Well, no actually. When we make a bridge with metal (as this one is) we make the metal accurately to support the ceramic evenly all over, so if we lengthen the ceramic there is a whole load of incisal ceramic with no support (this is why this bridge has a large cut incisally, we were testing to see if we thought we could lengthen without remaking the metal).

We felt in this case that we would remake the metal and start over. So we did and this is the bridge on the left.

According to the patient this is now too long!

So the solution? We highly, HIGH recommend doing a diagnostic wax up with cases like this, this then serves a few purposes.

  1. It can act as way for the dentist, technician and patient to visualise the desired results AND for the technician to ascertain whether the desired result is indeed possible with the position of the teeth and gums.
  2. It provides a template from which we can make a temporisation stent.
This second point is the crucial one in this case, if we had made a diagnostic we could have made a stent from this (pictured right) this could then have been used to make highly accurate temporaries which the patient could have worn to decide on the length.

If  they were too long, a little reduction is simple - if the patient thought they were too short then addition with composite to achieve the desired result is again easy.

All that is then required is an accurate impression of the agreed temporaries and we can make the bridge to match this in the lab.

A simple process that is so often overlooked to the detriment of patient happiness!

Thursday, 26 May 2011

The importance of the underlying tooth shade for dental crowns

This blog post is really a pictorial case study of a metal free crown and shows the importance of communicating the underlying shade to the laboratory.

The patient came to see us like this with an old PFM crown on the UL1 which needed replacing - a metal free crowns was requested by the dentists... but was this indicated cosmetically?


The simplest answer is, we don't know unless we can see what's underneath. So we asked the dentist to take a photo of the preparation and hold a shade guide to it so we could gauge the darkness of the tooth.


Once we knew the underlying tooth shade it is then possible to take a shade match, making an informed decision about the ceramic. For example, if we take a shade for a crown that is going to be really thin, then it may be that there is not enough ceramic material thickness to achieve that shade - so we may decide to make an A2 crown in A3 ceramic if that ceramic is going to be thin.

Also, if the underlying tooth is very dark, then we may decide to mix in a little A1 to the A2 ceramic to lighten it slightly to compensate.


So, we took the shade of the patient's tooth, and drew a detailed plan of the colours. Notice 2 things:
  1. We've taken a shade of the lingual as this will inevitably shine through and affect the colour of the labial
  2. We have taken a 3D shade, in other words we could see that the shade needed an overlay of enamel (EN2) and ultra clear (WIN)


We then went ahead and finished the crown - this is it in situ.


Overall the result was excellent for the patient, and having the underlying tooth shade helped us work with this in order to choose the correct ceramic to make the crown with.


Tuesday, 29 March 2011

Dental Case Selection

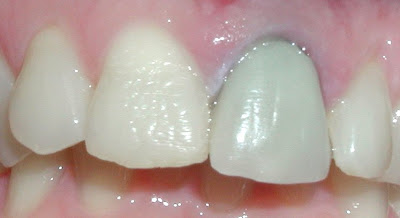
This was a case that came in to us with a problem! The Upper Left central had been root treated and another dentist and laboratory had made a metal free crown.

In this case the patient was insistent on metal free as they had been researching online (sometime the internet is not helpful!) - and as you can see the root treatment shows through and makes the whole crown look grey - I'm sure it looked great on the model, but in the mouth... not so great, so how do we get around this problem?


As we have discussed in previous blogs, covering a dark tooth with a root treatment and metal free crown is very difficult, so in this case we opted for a totally opaque core.

There aren't many opaque metal free substructures around, so we used Vita Inceram Zirconia - this is a material developed by Vita many years ago before the 'true' zirconia ceramics came out. Vita Inceram Zirconia is a combination of alumina and zirconia which results in high strength and an almost opaque core.

We rarely use this material now as we're not often asked to make an opaque metal free crown (usually a porcelain fused to metal crown is used), however you need to ensure that any laboratory you do decide to use has a detailed knowledge of materials available in order that they can advice as to the best restoration for any case.

Here's the result, still a little greynes showing through, but overall a much improved result.


What experiences do you have of trying to mask dark underlying teeth with metal free? What worked? And what didn't?

Thursday, 24 March 2011

Can YOU spot the crown?

Here is an interesting case you will like. So first up a question... which tooth is a crown? 

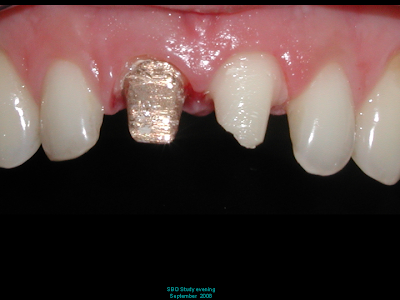
We've shown this case many times during presentations and lectures and most people can correctly identify the Upper Right Central as a crown - it has that slightly brighter and more opaque look to it and lacks an element of vitality.

This aesthetic effect is common with porcelain fused to metal crowns and is caused by the inability for the restoration to allow light to pass through, as it does with a natural tooth.

Even if the shade of the restoration is perfect and the shape, contour and morphology are great this 'bright' effect is often difficult... no, let's say often impossible, to overcome.

OK, so here is the truth about this case.... both centrals are crowns, except one has a root treated tooth with gold post and core.


When we started this case we didn't know that the Upper Right Central had this underlying core, so we didn't take this in to account when making the 2 metal free crowns.

So, the 2 crowns are made together, the same shade and same morphology, yet one looks bright... all caused by the root treated tooth underneath.

What lessons should be learnt?
  1. Dentists - Always tell the laboratory the condition of the underlying tooth with metal free crowns
  2. Technicians - If the dentists doesn't tell you what the underlying tooth condition is, ask!
  3. Dentists - Translucent Metal free is not the be all and end all. So be case selective about the material used.
  4. Technicians - have a variety of restorations available with a variety of opacity levels, this way you can inform the dentist as to the best restoration for each individual case
  5. Dentists - Send photos of preps, this gives the technician the best chance of choosing the best restoration
  6. Dentists - prescribe a crown if necessary, but tell the technician the clinical situation around which you need to fit it. Tell the technician the requirements for strength, bonding technique and what the underlying tooth is... then let your technician inform you as to the best restoration
  7. Technicians - Keep up to date with restoration options, know the issues facing a dentist and be prepared to offer an alternative if you feel the prescription may be less than perfect.
 To discuss restoration options for your patient, please call Keith on 01707 663293 for a friendly chat.

Tuesday, 15 March 2011

Are Zirconia Crowns Better than PFM?

Many dental practices will charge a higher fee for Zirconia crowns to the patients as this is often seen as a 'better' or 'private' option. I disagree.

PFM is a perfectly good option and is the ideal choice in many cases.

Here is an example. This patient wanted a crown on the upper right central to replace an old crown that didn't match the surrounding dentition.


The dentist wanted a metal free crown as this was perceived to be the best, however upon attendance at the surgery I noticed a metal post and core and advices that a PFM would be the best option.

The patient and dentist were concerned, but I insisted and this was the result.


A nice crown that matches.

Metal free are, by their nature, more translucent. In situations with natural teeth underneath this is fine, but with darker teeth or root treated teeth the cores can show through.

So long as the technician uses a ceramic margin that incorporates a fluorescent shoulder porcelain the aesthetics of the crown should be fine. Also required is around 1.5-2mm of labial reduction to ensure the opaque doesn't show through.

So are zirconia crowns better than PFM?, Well yes, sometimes and in with the right cases.

To recognise this fact as a laboratory we charge the SAME for all our crowns, this way there is never a temptation to chose one option over another. We believe this provides the best result for the patient.

When would you use a PFM over a Zirconia crown? 

Monday, 28 February 2011

A Full Mouth Dental Implant Case. The patient is always right!

This week we completed a full mouth upper implant case using a cast bar and denture teeth. This was the case in the laboratory.
On the articulator

One particular issue we has was the size of the teeth; the patient had a fixation on the size of teeth and was concerned that oversized teeth would make the denture stand out and not look natural. However we went ahead and made the fixed implant bridge as requested following the try in of the teeth she asked for.
Dental Implant Bridge Palatal View


Dental Implant Bridge Labial View
Here's the finished result notice the size of the denture teeth!


It's interesting to note the difference between how the bridge looked on the articulator and then in the mouth. On the arictulator the small size of the teeth were not as apparent, but in the mouth, with the reference points of the nose and smile it is immediately clear to us as dental professionals that they are slightly too small.

But the patient is always right? And she loved them, but this could so easily have been a mistake rather than a success.

So, what lessons can we draw from this?

I think the biggest lesson is to use photographs both in the laboratory and in the surgery to communicate and share. On articulators we can easily make a mistake as we don't have the reference points of the nose and smile... but in the mouth, those small mistakes quickly come to light.

So get those photos shared.... how else can we avoid simple mistakes like getting the size of the teeth right?